Wednesday, December 22, 2010

Cabinet doors

We cut out the face panel for the head's cabinet and set to work on making a door for it.
A couple of decades ago an ol' shipwright taught me how to build these doors.
They are easy to make, allow good ventilation, and are surprisingly strong.


You can make them any size, I like my frames to be 1.5 inches wide and about 7/8" thick to allow them to be routered down making a rabbet around the edge to inset them into the door frame. This leaves me with a half inch thickness atop the panel face.

Once the frames are cut I run them through the saw with the blade set to half an in depth to make the groove for the slats.
We made the slats by ripping boards to the width we wanted then running them through the table saw to get the strips. A thickness planer was used to clean em up and get them all to a uniform thickness.
Then several coats of finish was applied and after they were nice and dry they were cut to length on a chop saw. This is by far the most tedious and time consuming part of the process. I usually spend a day and make a large number of slats at one time and apply the finish and store them in long strips. That way when ever I get the urge to make a door I have plenty of slats on hand and  just have to cut them to length and the door can be assembled very quickly.
I bevel the ends of the slats slightly to make inserting them easier.
For the frame I like to inset the top and bottom rails a half inch into the side rails. this hides the groove for the slats when the door is viewed from the top (or bottom). A screw can be driven into the top and bottom rails from the sides if you like to stiffen it up and covered with a nice wood plug.
The slats are simply popped into place without glue (none is needed) working from one end to the other.
When we decide what the length of the door should be we typically divide it by the width of the slats and then adjust the length slightly so that the last slat fits perfectly without trimming the width.
I forgot to do this on this door so the last slat is a little narrower as a result,...but it will be at the bottom and no one but me will know!.....well .....me, and all of you now..... 
Bending in the last slat.
Test fitting the door and panel.

Wednesday, November 24, 2010

Shore power plugs

One of our suppliers passed on this article (picture below) that was published in Latitude 38 magazine.
I found it interesting and wanted to post it here for others to read.
As a marine surveyor I often go to a meticulously cared for vessel to perform a survey and find the ends of the shore power cord to be badly worn and in need of replacement.  It amazes me how something that gets handled every time the vessel leaves the dock can be left to deteriorate to the point where it causes so much resistance that it causes a melt down or in the extreme case in the article, almost kills someone.
If your plug is worn it would serve you well to replace it. I have seen insurance claims denied for fire damage caused by faulty receptacle plugs, it is often considered a maintenance issue and as such is not covered.
When unplugging the shore power cord from the vessel turn off the main circuit breaker on the vessels electrical panel before unplugging the vessel. Ideally this should be done on the dockside panel but they are often locked or otherwise inaccessible. When the plug is disconnected while energized it creates little arcs that cause minute pitting on the connectors. The pits fill with carbon deposits that are created when it arcs, the carbon creates resistance that leads to more arcing, more pitting, more carbon, etc. Before to long you have created significant resistance in the connection and are well on the way to a melt down.


Monday, November 8, 2010

Moving along

Lately the focus has been on finishing up loose ends.
A wash-down fixture was mounted on the foredeck and tied into the water pump for the toilet inlet. The toilet inlet water pump does three jobs now; provides water for the toilet, the deck wash-down, and a faucet at the head sink. There is no discharge  thru-hulls anywhere near the intake so their is no threat of contaminating the incoming water. The head discharges directly into the holding tank and is pumped overboard from time to time when permitted, or drawn thru a deck suction fitting when required. 
I plumbed a tee into the toilet discharge line and took it up to a deck fitting so that when pumping the holding tank the deck cap can be removed and a water hose used to flush the holding tank.

A ball valve was placed on the discharge side of the holding tank  and a macerator pump was plumbed in.
I got the pump from a customer who wanted a replacement pump as he considered this one to be too noisy.
I took it apart and cleaned, sanitized, and rebuilt it, put in new check valves and installed it my boat.
The disassembly and cleaning was a thoroughly disgusting job as there was a significant buildup of foul deposits that needed to be scraped and picked at to remove them from the orifices. Even though I saved a few hundred bucks on the pump I don't think its a task I'd care to repeat!
A two way valve was installed and the discharge line plumbed into it. From there one side of the valve went up to a deck suction fitting and the other through a vented loop to the overboard discharge thru-hull.
The last connections were made to the holding tank vent and filter and now the toilet system is finished and operational....although not tested at this time. It feels good to have another system completed and struck from the "to-do" list.

Thursday, October 14, 2010

Wiring

We plan on launching the boat this January or February and are at a stage in construction where there is plenty of individual projects left to do. Rather than trying to map out a rigid schedule we typically climb the ladder to the boat and work on whatever job we feel like tackling that night. I find the flexible approach to be more productive for our crew....its all got to be done before she sails so if one feels like cutting and fitting "have at it" ...if electrical is your interest break out the wire! 

Speaking of wire, we've been tackling some of that lately. I decided that the led lighting and low current draw items would be easier to run from two Blue Seas fuse boxes mounted forward rather than running everything back to the panel. I located one of the boxes in the head on the port side and the other in the V-berth hanging locker on the starboard side. The small loads for the port side run into the head fuse box and the starboard side loads run into the hanging locker. The fuse blocks are wired back to independent breakers on the main panel.

So far we have an LED two way light over the galley (shines red or white), a spot reading light for the starboard settee / berth that currently has a G4 bulb that we will swap out for an LED bulb, and a surface mounted LED light in the head that shines, red, white, or blue. The crew calls it our patriotic light.
A gold plated Cantaloupi light is mounted to the aft cabin wall above the chart table and doubles as a chart light and reading light for the port settee / berth. We installed an LED bulb in it to keep the power demands low. Its remarkable how far LED lighting has come. You can get almost every type of bulb in an LED now. Its great for retrofitting existing lights into low power drawing lights without breaking the bank.

The original plan was to use all gold plated fixtures below decks and stainless on deck thereby reducing the need to polish as the stainless and gold plating doesn't tarnish like brass and bronze.
We managed to purchase only the one gold plated fixture before reality climbed aboard and we realized we would not have enough "fun tokens" (money) to outfit her all in gold on our budget! It does look awfully nice over the chart table though, the gold sparkling in the light. Perhaps someday we will retrofit the rest......perhaps.


We found some self adhesive low profile plastic wire chases at the local Lowes hardware store and used them to run the wires in on the surface of the cabin.
While at Lowes we spotted a low profile strip of six outlets and bought it and installed it behind the port settee back. It was a bugger to install back there but its a great place for it. The A/C wiring comes out of the panel into a GFI duplex outlet above the shelf on the port side Settee. From there it goes down and into the strip of outlets then carries on through the head and into the V-berth and ends in a duplex outlet. 
The entertainment system will be wired into the strip, things that aren't usually unplugged until they fail, DVD player, Hi def TV, Bose system, etc. Their wires will be hidden and tucked up out of the way.
The two Duplex outlets will be used for laptop computers, cell phones, etc.

Installing Deck and Cabin fittings

We placed the cowl for the chain locker onto the deck and moved it around until we were satisfied with the location. As the chain locker is a self draining watertight compartment there was no need to install a dorade box under the cowl.


 A hole saw was used to cut the hole, starting on deck and cutting through about halfway then finishing the cut from under the deck drilling upwards. Cutting the hole from both sides prevents fragmenting the laminate as often happens when pushing through from one side.


Once the hole was made the Fein Multimaster was used to remove the core material between the laminate and the void was filled with a mixture of West System Epoxy and colloidal silica.


Once cured a drum sander was ran around inside the hole to clean up any epoxy spurs and ensure we had a uniform surface. The fitting was then bedded in 3M fast curing 4200.


The same method was used to cut the hole for the bulkhead compass. The notch at the bottom was cut out using a small flat blade on the Fein Multimaster tool.


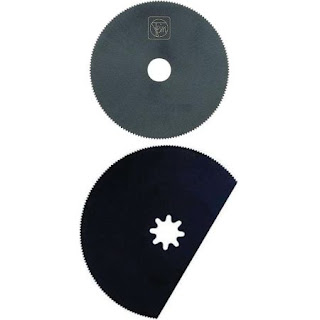
In response to the comment below and request for information; here is some pictures of the blades we have used in the MultiMaster tool.
The above blade we used to remove core materiel
The above blade was used to cut the lower portion of the compass hole


I really like the above blade with the flat portion. You can keep the flat edge very close to a shelf (for instance) and cut the bulkhead  neatly and flush to the shelf.

We have found the scraper blade  to be very fast at removing stubborn materiel. We used it a lot when re-coring portions of the deck to remove the balsa core and also on the hatches and window frames for removing old hatch gaskets and sealants. 


Thursday, September 16, 2010

The Power of the probe

Soon it will be time to hang the rudder back onto the boat.
Derek used the video scope to examine the rudder tube and ensure we left no voids or pockets that could cause problems later. Its a very useful tool and we can capture images or record video with it.
It was Derek's first time using the scope and as you can see by the picture he was suitably "wowed" by it.
The shaft and cutlass bearing is temporarily placed while we design the motor platform. 

There be tunes aboard!

With the majority of the dust making out of the way we brought the entertainment system aboard to install.
A Bose stereo system was installed and a nineteen inch Hi definition TV was mounted to the bulkhead on an articulated mount. We still have to tidy up the wiring for it all but its nice to have a high quality sound system playing while we work.
We thought it only fitting that the first movie to be shown aboard was "Yves Gelinas With Jean-de-Sud Around The World". The crew really enjoyed it and it was (and still is) played over and over while we work.